|
For Some Models
NOTE:
-
Be careful not to pry too far or you may bend the molding.
-
Put on gloves to protect your hands.
-
When removing the moldings, take care not to scratch the body.
-
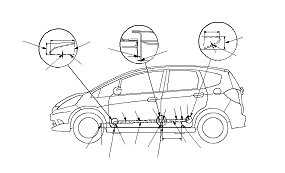
Gently pry the front door molding (A) or rear door molding (B) away from the door while separating the adhesive tape (C, D, E, F, G, H, I).
-
Clean the bonding surface with a sponge dampened in isopropyl alcohol. After cleaning, keep oil, grease, and water from getting on the surface.
-
Apply the moldings where shown and press the molding into place.
|
Adhesive tape (C):
|
Thickness 1.2 mm (0.047 in.) Width 38 mm (1.50 in.) Length 66.5 mm (2.62 in.)
|
|
Adhesive tape (D):
|
Thickness 1.2 mm (0.047 in.) Width 10 mm (0.39 in.) Length 888 mm (34.96 in.)
|
|
Adhesive tape (E):
|
Thickness 1.2 mm (0.047 in.) Width 30 mm (1.18 in.) Length 30 mm (1.18 in.)
|
|
Adhesive tape (F):
|
Thickness 1.2 mm (0.047 in.) Width 37 mm (1.46 in.) Length 40 mm (1.57 in.)
|
|
Adhesive tape (G):
|
Thickness 1.2 mm (0.047 in.) Width 10 mm (0.39 in.) Length 505 mm (19.88 in.)
|
|
Adhesive tape (H):
|
Thickness 1.2 mm (0.047 in.) Width 10 mm (0.39 in.) Length 460 mm (18.11 in.)
|
|
Adhesive tape (I):
|
Thickness 1.2 mm (0.047 in.) Width 36.5 mm (1.44 in.) Length 51 mm (2.01 in.)
|
|
|