|
|
A transient high tension (25,000 V) occurs at the bulb sockets or the high intensity discharge (HID) lamps when the combination light switch is turned ON, it may cause serious electrical shock or electrocution if you do not observe the cautions below.
|

|
-
Never turn on the combination light switch before fitting the HID bulbs to their bulb sockets and completing the reassembly of the headlight assembly.
-
Do not service the headlights assembly in wet conditions, such as rain or snow, near a sprinkler system, or when your hands are wet to prevent electrocution.
-
Do not touch the surface of the HID bulbs with your bare hands and do not stain it with any oils and fats.
-
Do not disassemble the inverter unit and the igniter unit.
-
Do not turn on the HID bulb by using a power source other than the battery mounted on your vehicle.
|
NOTE:
-
Before troubleshooting, check the No. 32 (15 A) fuse and No. 48 (15 A) fuse in the under-dash fuse/relay box.
-
Cool down the HID bulb before checking.
-
After checking, the HID system requires about 5 minutes to be normal condition.
-
Connect the HDS to the data link connector, then turn the ignition switch to ON (II).
-
Select the BODY ELECTRICAL menu, then enter the HEADLIGHT COMMAND from the FUNCTIONAL TESTS, and turn the headlights on repeatedly.
|
Do the headlights come on?
|
-
Turn the headlight switch OFF and the ignition switch in LOCK (0) position.
-
-
-
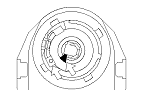
Check for loose or poor connections between the bulb socket and the HID bulb.
|
YES
|
-
|
|
|
NO
|
-
|
Install the bulb and the bulb socket correctly and recheck, then go to
Step 15
.
|
-
Check for corrosion and traces of electrical arcing at the socket mating part.
|
Is the socket corroded or burnt?
|
|
YES
|
-
|
Replace the bulb socket, and recheck, then go to
Step 15
.
|
|
NO
|
-
|
|
|
|