( TF09E8AB20200037701KDAT00 )
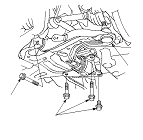
Front Lower Arm Removal/Installation

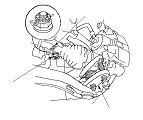
Special Tools Required

Ball joint remover, 28 mm
 07MAC-SL00201
Do not remove the lower arm of both sides at the same time.
  1. Remove the front wheel.
  1. Remove the lock pin (A) from the lower arm ball joint, then remove the castle nut (B).
    NOTE: During installation, install the lock pin as shown after tightening the new castle nut.
  1. NOTE:
    • Be careful not to damage the ball joint boot when installing the remover.
    • Do not force or hammer on the lower arm, or pry between the lower arm and the knuckle. You could damage the ball joint.

  1. Remove the lower arm mounting bolts, then remove the lower arm (A) from the front subframe.
    NOTE: Use new lower arm mounting bolts during reassembly.
  1. Install the lower arm in the reverse order of removal, and note these items:
    • First install all the components, and lightly tighten the bolts and the nuts, then raise the suspension to load it with the vehicle's weight before fully tightening to the specified torque values. Do not place the jack against the ball joint of the lower arm.
    • Be careful not to damage the ball joint boot when connecting the lower arm to the knuckle.
    • Before connecting the ball joint, degrease the threaded section and the tapered portion of the ball joint pin, the ball joint connecting hole, and the threaded section and the mating surfaces of the castle nut.
    • Torque the castle nut to the lower torque specification, then tighten it only far enough to align the slot with the ball joint pin hole. Do not align the castle nut by loosening it.
    • Before installing the wheel, clean the mating surfaces on the brake disc and the inside of the wheel.