( TF09E1TE10410400000KAAT00 )
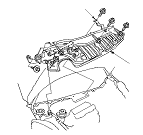
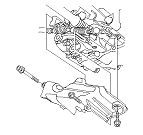
A/T Assembly Removal

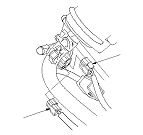
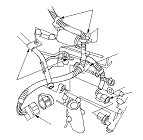
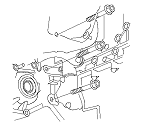
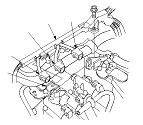
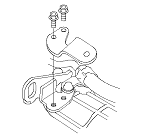
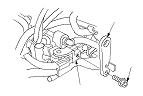
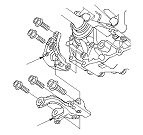
Special Tools Required

Hanger plate
 07MAK-PY30100

Engine support hanger
 AAR-T1256-J00
This special tool is available from Snap-on Tools International, LLC.
NOTE:
  • Use fender covers to avoid damaging painted surfaces.
  • Engine support hanger (AAR-T1256-J00) must be used with the side engine mount installed.
  1. Remove the battery base.
  1. Fix the hood in a vertical position.
  1. Remove the cowl cover stiffener (A), and remove the windshield wiper motor and center-front cowl cover (B).
  1. Raise the vehicle on a lift, and make sure it is securely supported.
  1. Remove the wheels.
  1. Remove the splash shield.

  1. Remove the drain plug (A), and drain the automatic transmission fluid (ATF).
  1. Reinstall the drain plug with a new sealing washer (B).

  1. Disconnect the A/T clutch pressure control solenoid valve A connector (A), A/T clutch pressure control solenoid valve B connector (B), and A/T clutch pressure control solenoid valve C connector (C).
  1. Remove the bolt securing the harness cover (D), and remove the harness cover from its bracket (E).

  1. Disconnect the transmission range switch connector (A).
  1. Disconnect the output shaft (countershaft) speed sensor connector (B), and remove the harness clamp (C) from its bracket (D).

  1. Disconnect the input shaft (mainshaft) speed sensor connector (A) and 2nd clutch transmission fluid pressure switch connector (B).

  1. Remove the ATF cooler hoses (A) from the ATF cooler lines (B). Turn the ends of the cooler hoses up to prevent ATF from flowing out, then plug the cooler hoses and lines.
  1. Check for any signs of leakage at the hose joints.

  1. Remove the bolt securing the harness clamp bracket (A).
  1. Disconnect the shift solenoid harness connector (B) and 3rd clutch transmission fluid pressure switch connector (C), and remove the harness clamps (D) from the clamp brackets (E).

  1. Remove the air cleaner housing mounting bracket from the transmission hanger.

  1. Install the hanger plate (07MAK-PY30100) (A) to the air cleaner housing mounting bracket (B) with the 8 x 1.25 mm bolt (C).

  1. Remove the harness clamp (A) from its clamp bracket (B) located in front of the left damper top.
  1. Set up the engine support hanger (AAR-T1256-J00). Carefully position the engine support hanger to the vehicle; position both cross-arm foot bases (C) over the harness clamp brackets on both sides, and position both front stands on the front bulkhead. Attach the hook to the hanger plate, tighten the wing nut by hand, and lift and support the engine.

  1. Insert a 5 mm Allen wrench (A) in the top of the ball joint pin (B), and remove the nuts (C), then separate the stabilizer link (D) from the stabilizer ends (E).
  1. With HID lamp model: If removing the left side lower arm, disconnect the suspension stroke sensor, and the lower arm.

  1. Remove the steering gearbox mounting bolt (A), bolt (B), and stiffener (C) on the right.

  1. Remove the steering gearbox mounting bolt (A), bolt (B), and stiffener (C) on the left.

  1. Remove the steering gearbox mounting bolt on the middle.

  1. Place a jack under the transmission, raise it just enough to take it off of the lower torque rod, and remove the lower torque rod bolt (A) on the transmission.
  1. Remove the lower torque rod nut (B) and bolt (C) on the front subframe, and remove the lower torque rod (D).
  1. Remove the jack.

  1. Support the front subframe with a wood piece and a jack.

  1. Remove the six bolts securing the front subframe.
  1. Hang the steering gearbox to the body with a strap.

  1. Remove the shift cable cover.

  1. Pry up the lock tab of the lock washer (A), and remove the lock bolt (B) and lock washer.
  1. Remove the bolts securing the shift cable holder (C), and separate the shift cable (D) from the selector control shaft end (E). Do not bend the shift cable excessively.

  1. Remove the lower torque rod mounting bracket (A) and shift cable holder bracket (B).

  1. Remove the torque converter cover (A), and remove the drive plate bolts (B) (eight bolts) while rotating the crankshaft pulley.

  1. Coat all precision machined surfaces with clean engine oil, then put plastic bags over driveshaft ends.

  1. Remove the bolts securing the heat shield (A).
  1. Remove the intermediate shaft (B) and heat shield.
  1. Coat all precision finished surfaces with clean engine oil, then put plastic bags over intermediate shaft ends.

  1. Remove the front and upper transmission housing mounting bolts.

  1. Remove the transmission ground cable terminal (A) from the transmission mount bracket (B).
  1. Place a jack under the transmission, raise it just enough to take it off of the mount, and remove the transmission mount and mount bracket.
  1. Remove the jack.

  1. Remove the rear transmission housing mounting bolts.
  1. Lower the transmission by loosening the wing nut on the engine support hanger, and tilt the engine just enough for the end of the transmission to clear the side frame.
  1. Place a jack under the transmission.

  1. Remove the lower transmission housing mounting bolts.
  1. Slide the transmission away from the engine to remove it from the vehicle.

  1. Remove the torque converter and dowel pins.