( TF09E00J54400027191KBAT00 )
Front Corner Glass Replacement

NOTE:
  • Put on gloves to protect your hands.
  • Wear eye protection while cutting the glass adhesive.
  • Use seat covers to avoid damaging any surfaces.
  • The front corner trim and the front corner glass clips will need replacement because they will be damage during glass removal.
  1. Remove these items:
  1. Remove the front corner trim (A).
    -1.
    From inside the vehicle, use a utility knife to cut through the adhesive (B) of the front corner trim.
    -2.
    Pull out the upper edge of the front corner trim.
    -3.
    Pull out the lower edge of the front corner trim, then remove it.
    NOTE: Replace the front corner trim with a new one.

  1. From inside the vehicle, use a utility knife (A) to cut through the front corner glass adhesive (B) all the way around. Apply protective tape along the edge of the entire front corner glass opening flange.

  1. From inside the vehicle, cut through the clips (A, B) of the front corner glass with a utility knife.
  1. Carefully remove the front corner glass.
  1. With a putty knife, scrape the old adhesive smooth to a thickness of about 2 mm (0.08 in.) on the bonding surface around the entire front corner glass opening flange:
    • Do not scrape down to the painted surface of the body; damaged paint will interfere with proper bonding.
    • Remove the clips and the rubber dams from the body
  1. Clean the body bonding surface with a sponge dampened in isopropyl alcohol. After cleaning, keep oil, grease and water from getting on the surface.
  1. If the old front corner glass is to be reinstalled, use a putty knife to scrape off all of the old adhesive and clips from the front corner glass. Clean the inside face of the front corner glass and the edge of the glass with isopropyl alcohol where new adhesive is to be applied. Make sure the bonding surface is kept free of water, oil and grease.

  1. Attach the front corner trim (A) with adhesive tape to the inside face of the front corner glass (B) as shown. Before installing the front corner trim, apply primer to the inside face of the front corner glass:
    • Be careful not to touch the glass where adhesive will be applied.
    • The front corner trim must be replaced with a new one.
    • Be sure the bottom edge of the front corner trim lines up with the alignment mark (C).
    • Be sure the top edge of the front corner trim lines up with the top edge of the glass.
    Front corner trim adhesive tape:
    Thickness 0.8 mm (0.03 in.)
    Width 5 mm (0.197 in.)


  1. Attach the clip A (A), the clip B (B, C) with adhesive tape to the inside face of the front corner glass (D) as shown:
    • Be careful not to touch the glass where adhesive will be applied.
    • Be sure the clip B (B) lines up with the inner shape of the front corner trim (E).
    • Be sure the side portion (F) of the clip A lines up with the front corner trim.
    Clip A adhesive tape:
    Thickness 1.2 mm (0.047 in.)
    Width 8 mm (0.315 in.)
    Clip B adhesive tape:
    Thickness 1.2 mm (0.047 in.)
    Width 16 mm (0.63 in.)


  1. Attach the rubber dam (A, B) with adhesive tape to the inside face of the front corner glass (C) as shown.
    Before installing the rubber dam, apply primer to the inside face of the front corner glass.
    NOTE: Be careful not to touch the front corner glass where adhesive will be applied.
    Rubber dam adhesive tape:
    Thickness 0.2 mm (0.0079 in.)
    Width 3 mm (0.12 in.)


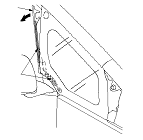
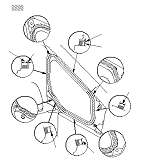
  1. With a sponge, apply a light coat of glass primer to the inside face of the front corner glass (A) as shown, then lightly wipe it off with gauze or cheesecloth:
    • With the printed dots (B) on the front corner glass as a guide, apply the glass primer to the corner portions of the front corner glass.
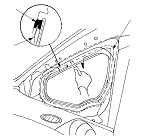
    • Do not apply body primer to the front corner glass, and do not get body and glass primer sponges mixed up.
    • Never touch the primed surfaces with your hands. If you do, the adhesive may not bond to the front corner glass properly, causing a leak after the front corner glass is installed.
    • Keep water, dust, and abrasive materials away from the primed surface.

  1. With a sponge, apply a light coat of body primer to any exposed paint or metal around the flange where new adhesive will be applied. Let the body primer dry for at least 10 minutes:
    • Do not apply glass primer to the body, and be careful not to mix up glass and body primer sponges.
    • Do not apply body primer to any remaining original adhesive on the flange.
    • Never touch the primed surfaces with your hands.
    • Mask off the dashboard before painting the flange.

  1. Cut a ‘‘V'' in the end of the nozzle (A) on the adhesive cartridge as shown.

  1. Put the cartridge in a caulking gun, and run a bead of adhesive (A) around the edge of the front corner glass (B) and along the rubber dam (C, D) and front corner trim (E) as shown:
    • With the printed dots (F) on the front corner glass as a guide, apply the adhesive to the corner portions of the front corner glass.
    • Apply the adhesive within 30 minutes after applying the glass primer. Make a slightly thicker bead at each corner.

  1. Use suction cups (A) to hold the front corner glass (B) over the opening, align it with the clips (C, D), and set it down on the adhesive. Lightly push on the front corner glass until its edges are fully seated on the adhesive all the way around.
    NOTE: Do not open or close any of the doors for about an hour until the adhesive is dry.
  1. Scrape or wipe the excess adhesive off with a putty knife or towel. To remove adhesive from a painted surface or the front corner glass, use a soft shop towel dampened with isopropyl alcohol.
  1. After the adhesive has dried, spray water over the front corner glass and check for leaks. Mark the leaking areas and let the front corner glass dry, then seal with sealant. Let the vehicle stand for at least 4 hours after front corner glass installation. If the vehicle has to be used within the first 4 hours, it must be driven slowly.
  1. Reinstall all remaining removed parts.
    NOTE: Advise the customer not to do the following things for 2 to 3 days:
    • Slam the doors with all the windows rolled up.
    • Twist the body excessively (such as when going in and out of driveways at an angle or driving over rough, uneven roads).