-
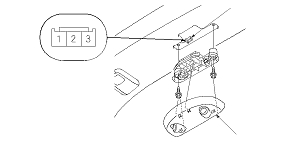
Carefully pry off the ultrasonic sensor cover (A) with a small screwdriver.
-
Remove the mounting screws.
-
Disconnect the 3P connector (B) from the ultrasonic sensor.
-
Inspect the connector and socket terminals to be sure they are all making good contact.
-
With the connector still disconnected, make these input tests at the connector.
-
If any test indicates a problem, find and correct the cause, then recheck the system.
-
If all the input tests prove OK, the ultrasonic sensor must be faulty, replace it.
|
Cavity
|
Wire
|
Test condition
|
Test: Desired result
|
Possible cause if desired result is not obtained
|
|
1
|
PNK
|
Under all conditions
|
Measure the voltage to ground: There should be battery voltage.
|
|
|
2
|
GRN
|
Alarm control siren 6P connector disconnected
|
Check for continuity between the No. 2 terminal and No. 4 terminal of the alarm control siren: There should be continuity.
|
An open in the wire
|
|
Check for continuity to ground: There should be no continuity.
|
A short to ground in the wire
|
|
3
|
BLK
|
Under all conditions
|
Check for continuity to ground: There should be continuity.
|
-
Poor ground (G602)
-
An open in the wire
|
|
|