|
NOTE:
-
Take care not to scratch the dashboard and its related parts.
-
When removing components, use the trim tools or equivalent.
-
RHD model is shown; LHD model is symmetrical.
-
-
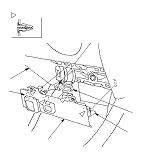
Remove the center lower trim (A).
|
-1.
|
Use the trim tool to pry the gap between the dashboard (B) and the upper side of the center lower trim partially out and release the clips and hooks (C).
|
|
-2.
|
Pull out the center lower trim slightly toward you and disconnect the accessory power socket connector (D) and USB connector (E) (if equipped).
|
-
Install the trim in the reverse order of removal, and note these items:
-
Check if the clips are damaged or stress-whitened, and if necessary, replace them with new ones.
-
Push the clips and the hooks into place securely.
-
Make sure the connectors are plugged in properly.
|
|