Crankshaft and Piston Removal
-
-
Remove the transmission:
-
-
-
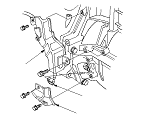
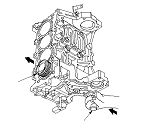
Remove the crankshaft position (CKP) sensor cover (A), then disconnect the CKP sensor connector (B).
-
Remove the harness cover (C).
-
-
-
|
|
-
Remove the bearing cap bolts. To prevent warpage, unscrew the bolts in sequence 1/3 turn at a time; repeat the sequence until all bolts are loosened.
-
Remove the bearing cap bridge.
-
Remove the rod caps/bearings. Keep all caps/ bearings in order.
|
|
-
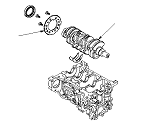
Lift crankshaft (A) out of the engine. Be careful not to damage the journals and the CKP pulse plate (B).
-
Remove the CKP pulse plate.
-
Remove the upper bearing halves from the connecting rods, and set them aside with their respective caps.
|
|
-
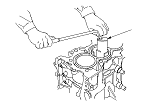
If you can feel a ridge of metal or hard carbon around the top of each cylinder, remove it with a ridge reamer (A). Follow the reamer manufacturer's instructions. If the ridge is not removed, it may damage the pistons as they are pushed out.
|
|
-
Use the wooden handle of a hammer (A) to drive out the piston/connecting rod assembly (B). Take care not to damage the cylinder with the connecting rod.
-
Reinstall the bearing cap bridge and bearings on the engine in the proper order.
-
Reinstall the connecting rod bearings and caps after removing each piston/connecting rod assembly.
-
Mark each piston/connecting rod assembly with its cylinder number to make sure they are reused in original order.
NOTE: The existing number on the connecting rod does not indicate its position in the engine, it indicates the rod bore size.
|
|